Where to splurge, where to save, and where to improvise
Let’s get something straight right off the bat: you don’t need to drop a grand to build an effective bug out bag. I’ve seen too many folks get discouraged by YouTube “experts” flashing $2,000 setups, acting like anything less will get you killed. That’s nonsense, and it’s keeping regular people from getting prepared.
Here’s the truth I’ve learned after helping hundreds of community members build their first BOBs: smart spending beats big spending every single time. You can build a solid, reliable go-bag for under $300 if you know where to focus your dollars and where to get creative.
The Three-Tier Priority System
Before we talk specific gear, you need to understand how to think about spending. I break every BOB item into three tiers:
Tier 1 – Foundation Items (Splurge Here) These are the items that literally keep you alive and functioning. If they fail, you’re in serious trouble. This is where your money should go first.
Tier 2 – Important But Not Critical (Middle Ground) Useful items that make your life significantly easier, but you won’t die without them. Look for good value here, not necessarily the cheapest or most expensive.
Tier 3 – Nice-to-Have (Save Money Here) Items that provide comfort or convenience but aren’t essential for survival. This is where you can go cheap, DIY, or skip entirely when starting out.
Tier 1: Where to Invest Your Money
Your Pack Itself ($80-150)
This is not the place to go cheap. A quality backpack will carry everything else comfortably and last for years. Look for:
- External frame packs from brands like Kelty or REI Co-op (often $100-120)
- Military surplus ALICE or MOLLE packs ($60-80, built like tanks)
- Avoid: Generic Amazon packs under $50 – the straps and zippers will fail when you need them most
I’ve seen people spend $300 on gear, then stuff it in a $30 pack that falls apart during their first practice drill. Don’t be that person.
Water Filtration ($25-40)
Clean water is non-negotiable. Here’s where to put your money:
- Sawyer Mini or LifeStraw ($20-25) – proven, reliable, lightweight
- Add water purification tablets as backup ($8-12)
- Skip the expensive UV purifiers and fancy multi-stage systems for now

Shelter System ($40-80)
You need something between you and the elements:
- Quality emergency bivvy ($25-35) – get one that’s actually waterproof, not just “water-resistant”
- OR a lightweight tarp with paracord ($30-50) – more versatile but requires more skill
- Mylar emergency blankets are backup only, not primary shelter
Tier 2: The Smart Middle Ground
Clothing Layers ($30-60)
- One quality merino wool base layer ($25-40) – regulates temperature, doesn’t stink
- Rain poncho that doubles as tarp ($15-25)
- Skip expensive “tactical” clothing – it screams “I have valuable stuff”
Tools ($20-40)
- Fixed-blade knife ($15-25) – Mora or similar, not a $200 “survival” knife
- Multi-tool ($20-30) – Leatherman Wave or similar mid-range option
- Flashlight with extra batteries ($10-15) – LED headlamp preferred
First Aid ($25-45)
- Pre-made adventure medical kit ($20-30) as base
- Add personal medications and a few specific items
- Don’t build from scratch unless you’re medically trained

Tier 3: Where to Save (And How)
Food ($15-30)
Forget the $12 freeze-dried meals. You need calories, not gourmet dining:
- Peanut butter packets and crackers
- Energy bars (buy in bulk, repackage)
- Instant oatmeal packets
- Hard candy for quick energy
DIY Win: Make your own trail mix. Nuts, dried fruit, and chocolate chips cost half what pre-made versions do.
Fire Starting ($5-10)
- Bic lighters (buy a 5-pack for $3)
- Waterproof matches ($2-3)
- Skip the $50 fire steel kits – learn to use what you have first
Cordage and Repair ($8-15)
- 100 feet of paracord ($8-10)
- Duct tape wrapped around a pencil (basically free)
- Safety pins and needle/thread from dollar store
Communication ($0-25)
- Battery-powered AM/FM radio ($10-15)
- Emergency whistle ($2-3)
- Skip the expensive two-way radios unless your family is trained to use them
The DIY Heroes: Free and Nearly-Free Solutions
Some of the best BOB items cost almost nothing if you’re willing to get creative:
Free Emergency Blankets: Ask your local road race organizers – they usually have extras from events.
Container Solutions: Peanut butter jars make excellent waterproof storage. Altoids tins are perfect for small items.
Char Cloth: Make fire-starting material from old cotton t-shirts and a tin can.
Water Containers: Clean 2-liter soda bottles are lightweight and free. Sports drink bottles are even more durable.
Maps: Most state tourism offices will send you free road maps. Print backup copies of your evacuation routes.
The Build-Over-Time Strategy
Here’s the reality: you don’t need everything on day one. Start with the basics and add over time:
Month 1 ($100-150): Pack, water filter, basic food, emergency blanket Month 2 ($50-75): Add proper shelter, improve clothing layers Month 3 ($40-60): Tools, better first aid kit, communication Month 4+: Upgrade and refine based on practice sessions
This approach keeps you from going into debt and lets you learn what you actually need versus what you think you need.
When Cheap Gear Will Actually Get You Killed
Let me be clear about something: there ARE times when buying cheap is dangerous. Here’s what not to skimp on:
- Anything with straps or buckles that bear weight – pack straps, carabiner clips
- Water filtration – your health isn’t worth saving $10
- Shelter from elements – hypothermia kills faster than hunger
- Knife blade steel – a knife that won’t hold an edge is useless
But here’s what you CAN go cheap on without worry:
- Storage containers and bags
- Basic tools like can openers
- Most clothing (just avoid cotton in cold climates)
- Entertainment items like playing cards
The Brand Name Trap
“Tactical” and “military-grade” are marketing terms, not quality indicators. Some of the best BOB gear comes from:
- Camping/outdoor retailers (REI, Dick’s Sporting Goods)
- Hardware stores (for tools and basic supplies)
- Thrift stores (for clothing and containers)
- Dollar stores (for basic consumables)
The $200 “tactical” knife performs the same basic functions as a $25 Mora. The difference is marketing, not capability.
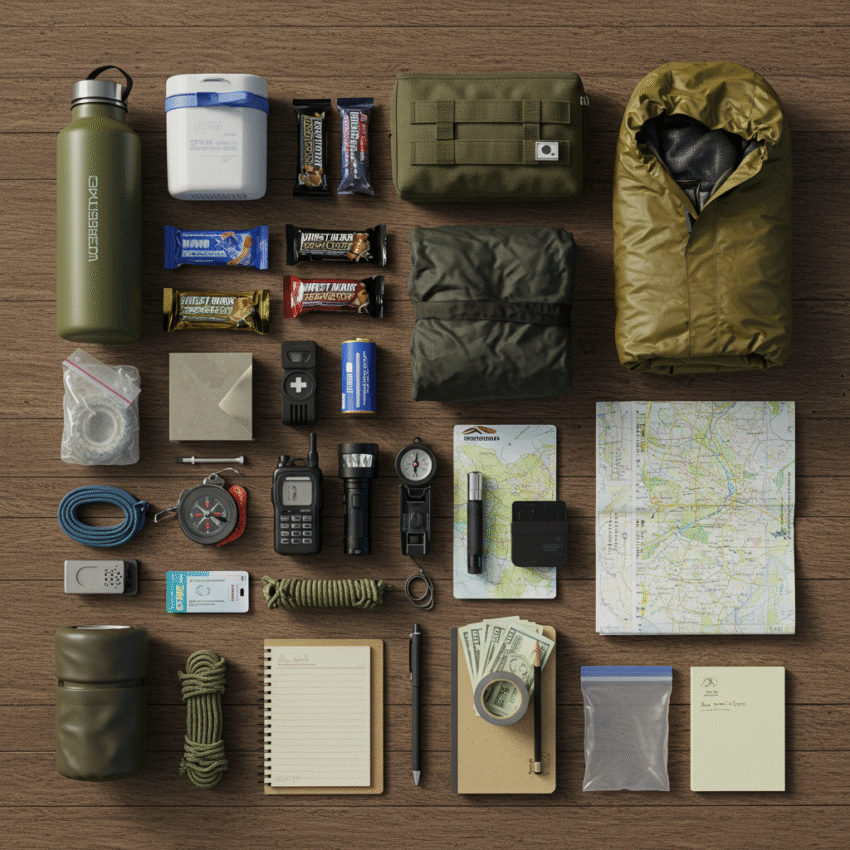
Reality Check: What a $250 BOB Actually Looks Like
Here’s a complete, functional bug out bag for someone on a tight budget:
- Pack: Used ALICE pack from surplus store ($60)
- Shelter: Quality bivvy sack ($30)
- Water: Sawyer Mini + tablets + 2 bottles ($35)
- Food: 3 days of calorie-dense basics ($20)
- Tools: Mora knife + basic multi-tool ($35)
- Fire: Lighters + matches + char cloth ($8)
- First Aid: Adventure Medical kit + personal meds ($30)
- Clothing: Base layer + rain gear ($45)
- Misc: Cordage, duct tape, flashlight, radio ($35)
Total: $298
This bag will keep you alive and relatively comfortable for 72 hours in most emergency scenarios. It’s not Instagram-pretty, but it works.
The Upgrade Path
Once you’ve got your basic setup and have actually used it (hint: you need to practice with your gear), you can start upgrading based on real experience:
- Replace items that failed during practice
- Add comfort items if you have room and weight capacity
- Upgrade to lighter versions of things that work but are heavy
- Add redundancy for critical items
Building Community Resources
Here’s something most BOB articles won’t tell you: the cheapest way to improve your preparedness is to build relationships with neighbors. Consider:
- Group buys for expensive items like quality radios
- Skill sharing – someone teaches fire starting, another teaches first aid
- Equipment sharing for items you rarely need
- Bulk purchasing of consumables
The strongest BOB is one that connects to a prepared community, not one that assumes you’re going it alone.
Testing Your Budget Build
The real test of any BOB isn’t how much it cost – it’s whether it works when you need it. Here’s how to validate your budget build:
- Pack weight test: Load it up and walk 2 miles. If you can’t, start removing non-essentials.
- Setup drill: Can you deploy your shelter in the dark, in the rain, in under 10 minutes?
- Water test: Use only your BOB water system for 24 hours at home.
- Food test: Eat only your BOB food for 3 days. Still have energy?
If your $250 setup passes these tests, it’s more reliable than most $1,500 setups that never leave the closet.
The Bottom Line
Building an effective bug out bag isn’t about having the most expensive gear or the coolest tactical setup. It’s about having reliable equipment that you know how to use, that fits your specific threats and situation, and that you can actually carry when you need to.
The best BOB is the one you can afford to build, afford to maintain, and are motivated to actually practice with. Start with the basics, learn what works for you, and upgrade based on real experience, not marketing hype.
Your safety doesn’t have a price tag, but it also doesn’t require a second mortgage. Build smart, build gradually, and build for your real life – not for a survival fantasy.